Lilmama & Bray

Lilmama & Bray
Mommy's sweet angel

My favorite diy & dollar tree diy &blogs to follow

These are some of my glamgirlz blogs, pages & websites they are amazing go follow, join or subscribe to them.

 These are some of my favorite diy. I did the following diy they are so cute & easy to do.

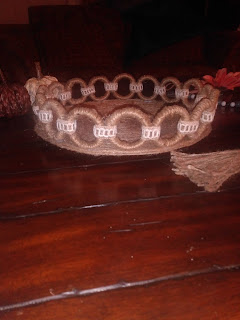
Diy #1 Jute wrappedG dollar tree tray 

Diy #1 jute wrapped dollar tree 
Materials: 1 charger or clear party tray from dollar tree

Jute, twine or nautical rope

Hot glue n gun 

(Optional 2 packs dollar tree shower curtain rings 

Ribbon) 

Start by putting super glue in the center of your charger or party tray and wrap your nautical rope real tight in a circle and just keep wrapping it outwards and hot glue as you go until you get to the end of your charger or tray when you get to the end you're going to want to wrap the edge of the charger or tray so its not visible and then just hot glue the end piece under your charger or tray and you can stop here and have a beautiful tray or you can go one step farther like I did and take shower curtain rings from the Dollar tree and also wrap them with your Jute or nautical rope and then you're going to glue them together all around the edge on top and then connect them with a piece of ribbon and then you're done and this is how mine turned out


Diy #2 mini dollar tree wood tray

Materials: dollar tree mini tray 

1pc scrapbook paper 

Jute/nautical rope or twine 

Hot glue & gun 

Mod podge, white paint, & brown paint 

Brown marker or paint pen

I started w 2 good coats of Waverly Chalk Paint & painted the entire tray & let that completely dry  then cut out the paper to the size of the inside of the tray and then you're going to take a good generous amount of mod podge and put it in the bottom of your tray and lay your paper down & gently smooth out any bubbles and then put another coat of mod podge on top of your paper, when that's finished go around the edges of your tray with a brown sharpie or marker and just make it look distressed then you're going to take your Jute twine or  nautical rope whichever one you chose and go around all of the edges of the tray the top the sides the bottom the handles everything and then all you do is put some decor in it and style it and you're done here's how mine looks 


Diy #3 wood wording sign

Materials: a large piece of wood or foam board from Dollar tree nautical rope

Some of the Dollar tree words or words off Amazon

 paint color of your choice 

 some scrapbook paper 

hot glue gun and hot glue

 e6000 

some command strips or hanging nails

First you're going to take your words from Dollar tree or Amazon and paint or mod podge scrapbook paper over them if you want to do the scrapbook paper all you do is put some mod podge on your word lay the scrapbook paper down smooth it out & add a coat of mod podge on top of your scrapbook paper then cut the excess off as close as you can get but it doesn't have to be all the way to the edge u can sand the res, take your sanding block and don't sand from side to side or bottom to top sand from top to bottom only around the edges to remove any extra excess you couldn't get by cutting, if you're painting the words I recommend doing two good coats of paint and let that dry when you have your words finished you just want to arrange them on your piece of wood or foam board the way you like them and then take e6000 and hot glue & attach them, the hot glue will instantly hold while the e6000 is drying and you need to let the e6000 dry overnight then take your jute & cut how many you want to add to each end, I cut six strips three on each side and hot glue them three on each end not letting the jute go on the back of my wood or when you hang it it won't lay up against the wall and that's it just connect your command strips or nails to the back and hang on the wall & here's how mine turned out 


Diy #4 pictures


Materials: a charger or piece of wood or foam board
A calendar photo or photo 
Mod podge, gorilla spray glue
 Jute or nautical rope
Lg pop cycle sticks 
Waverly wax or stain
Brown marker
Greenery
Project #1 charger w canvas
Im using a clear party tray from dollar tree and a piece of foam board, a picture from a dollar tree calendar & a canvas photo from dollar tree 
i paint the clear party charger w2 coats of white chalk paint let it dry & apply a coat of mod podge in the center of my charger then i take the canvas & cut it out from it's frame i cut it to fit in the center of my charger & smooth out any wrinkles or bubbles & apply a coat of mod podge on top of my canvas when it dries i apply jute around the edge of that center circle & add a jute bow  to make it look distressed i take a brown marker & go around the edge of the charger not trying to stay on the edge then I stick a lil greenery under the bow & it's finished 
Project #2 calendar picture
Now i take my foam board & spray it with gorilla glue or use mod podge then i take the page from a dollar tree calendar & place it on my foam board then i take some Waverly wax in antique and a foam brush from Dollar tree and I go over some popsicle sticks the large ones and then I just take a rag and wipe it right off that way it just leaves this stained look then I take my large popsicle sticks & border them around my calendar print & hot glue them on I put a lil piece of jute on the back to hang it w and its finished & heres how they turned out


Diy #5 thankful dollar tree pizza pan 


Materials: pizza pan
Black flat spray paint
Burlap ribbon
Word 
Ribbon
Jute, twine or nautical rope
Greenery
Paint your pizza pan & your word I used 2 coats of flat black spray paint (1 coat on word unless it's a wood word) let dry between coats when it's dry Go around the edge of the center portion w your jute, twine or nautical rope then add 2 rows of your burlap so it's bigger than your ribbon & shows good just glue those down in the center of your pizza pan then put a row of your ribbon centered on your burlap now add your word on top of your ribbon then you can add a bow n some greenery stuck under your bow & here's how mine turned out


Diy #6 Dollar tree Chargers


Materials: 2 dollar tree chargers

2 Wood words from Dollar tree or Amazon 
Burlap ribbon, burlap, & ribbon
Mini dollar tree wood cubes
Chalk spray paint & chalk paint
Greenery
Hot glue & hot glue gun

Project #1 buffalo check blessed dollar tree charger
Start by painting your word whatever color you want it then take your burlap ribbon and make 2 rows of it and put it n the center of your charger and hot glue it on the back side of your charger then repeat w  your ribbon (if it ribbon is wide then u can slip this step ,& just lay a single row) and lay it centered in between your burlap ribbon and glue it on the back side, next hot glue your word in the center of your ribbon on your charger, now take a couple of those small woodcraft cubes and stick them under both of your ribbons and hot glue just a couple this is just to hold your word up level with the sides of the charger now take your ribbon & tie a bow & attach it to the top or bottom I attached mine to the bottom and added a little bit of Dollar tree greenery pics and just hot glue them up under my ribbon & here's how mine turned out 


Project #2 dollar tree family charger

Start off with spray painting or hand painting ur charger n word I used chalk spray paint and did 2 good coats to my charger and my word then when all that's dry take your burlap ribbon and lay two rows across the center of your charger & hot glue it on the back side then take your ribbon and lay it in the center of your burlap ribbon and glue it on the back side now you can take a couple of those woodcraft cubes and slide them under your burlap and hot glue a couple to the tray charger now add your bow to the top or bottom I added mine to the top and here's how mine turned out

Family Door Hanger

MATERIALS: - Piece of Wood
Family Sticker or Wood Word
Ribbon
Wood Beads
1 Button
Floral wire
Waverly's white Chalk paint
Waverly's Wax Antique

I took a piece of wood and gave it 1 good Coat of white Chalk paint Then I took The Waverly Wax N Antique & Stained it Then I just Added a family Sticker from Dollar tree & Stuck it On Then Added a few Beads to The floral wire Hot Glued it to the back added a bow and a button in the Middle & heres ho

3 MiNI DIY 4 UR Tiered trays


Check out these amazing diy, hacks, tips decorating & organizing on a budget by the 2 queens of doing it on a budget!! If You haven't Been to her channel you're seriously missing out she is so down to earth and easy to relate with and she makes the best stuff and she has a way of explaining it so that you understand it and can do it very easily and on a budget. She doesn't irritate you she's great I highly recommend you checking out her channels she has videos on Facebook, YouTube, Instagram and  and she post hacks, tips, DIYs, anything and everything you can think of that comes to making your life easier and decorate your house on a budget and making it look great if you only follow one person here she is.

Liz Fenwick 

Y


DO It ON A DIME   


For all things beauty & makeup & fashion follow my #glamgirlz below

Girl Got Glow Gabrielle Scholl

https://www.youtube.com/channel/UC9gcAkYWsJATol3k_kjYRug

Alegra Chetti


Yari G

https://instagram.com/yari.g_?igshid=17eyvtbdxyxub


Faith Drew

https://www.youtube.com/channel/UCqlQEovBUMwBPuk2IBo-6TA
Melinda Fenves
https://www.youtube.com/channel/UClcssQARozV8C-aLZ-rhrww


Sl MissGlam

https://www.youtube.com/channel/UCyATvQaV1vh0hTqRzFLrs1g


Rever Chasseur The Life of a Dreamer
https://mimiroxy16.wixsite.com/mysite-1/about


This is a incredibly talented make up artist and she has even came out with her own make up. You have to go Follow her Facebook page!!! She's amazing & a sweet angel!! https://m.facebook.com/pg/theangelicalchemist/about/?mt_nav=1


Ever need your makeup done she'll come to you she's awesome check out her website.
https://www.masterglamgirl.com/

This site is dedicated to an in-depth knowledge of food allergies, seasonal allergies, and sensitivities. Please join the conversation. https://organicallergyrelief.com/


No comments:

Post a Comment